
|
Once you've read the section on understanding chord construction, the next question is how to use this in practice. A good first step is to see how it applies to chord shapes you already know. See where the 1 (or root), 3 and 5 are to be found in these familiar chord shapes: 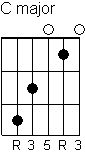
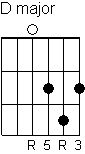
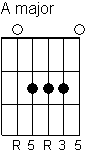
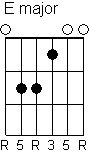
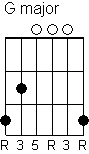
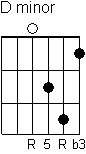
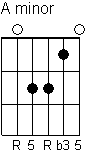
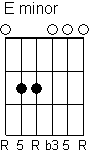
This is about getting away from seeing chords as just shapes to be learned, and instead understanding how they work, why each finger is here and not there, how each finger is functioning in the chord. Note the repeating 3-note shape "motifs" R-3-5 and 5-R-3 that you find across all these chords - that makes it easier to remember those finger functions. |
|
With this knowledge, we can start to derive some jazz chord grips.
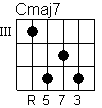
As a first example, let's take the A major shape
and make it into a maj7 chord. That requires us to add the 7,
which is a half-tone below the root. The diagram above shows
we're fingering the root on the 3rd string, so we just need to
move this finger back a fret to get the 7. The result is shown
on the right, shifted up to the 3rd fret to stay in the key of C.
Note that I eliminated the duplicate 5 on the top string. In pop, rock and folk where the guitar is often the only harmony instrument comping behind a singer, a thick strumming sound using all strings sounds good. But in jazz, it's better to keep things simple by avoiding such duplication. |
|
|
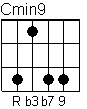
Next exercise, derive a Cmin9 from the C major shape. On the 5th string
of C major we have the root, that can stay put. On the 4th string
we have the 3, this goes back one fret to make the b3 for the minor
chord. On the 3rd string we have the 5, this goes up 3 frets to make
the b7. On the 2nd we have the root, this goes up 2 frets to make
the 9. Those are all the notes we need, so we can skip the top string.
|
|
|
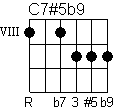
Finally, to prove we can use this approach to find a grip for
a more complicated chord name, we'll tackle C7#5b9. Again we
take the E major shape as a starting point. The root stays on
the 6th string, we don't need the 5th string, the root on the
4th string is moved back 2 frets to get a b7, the 3 on the 3rd
string stays put. Now consider the top two strings in the E major
diagram. On the 2nd string we have the 5, we can move this up
one fret to get the #5. On the top string we have the root, up
two frets from there would give us the 9, so up one fret gives
us the b9. Voila!
|
|
|
In addition to letting you grab complex jazz chords on the fly
without needing to memorize a 1000-page chord bible first, this
knowledge of where the chord tones are is useful for improvising.
So it's definitely worth taking some time to get familiar with this.
By the way, when I was first trying to get to grips with this material I wrote myself a little Windows program for exploring the functions of notes within chords. I used the same program to create all the chord and scale diagrams in this guide. If you'd like it, the program is a free download. Enjoy! |